


MSC Sparkle Co
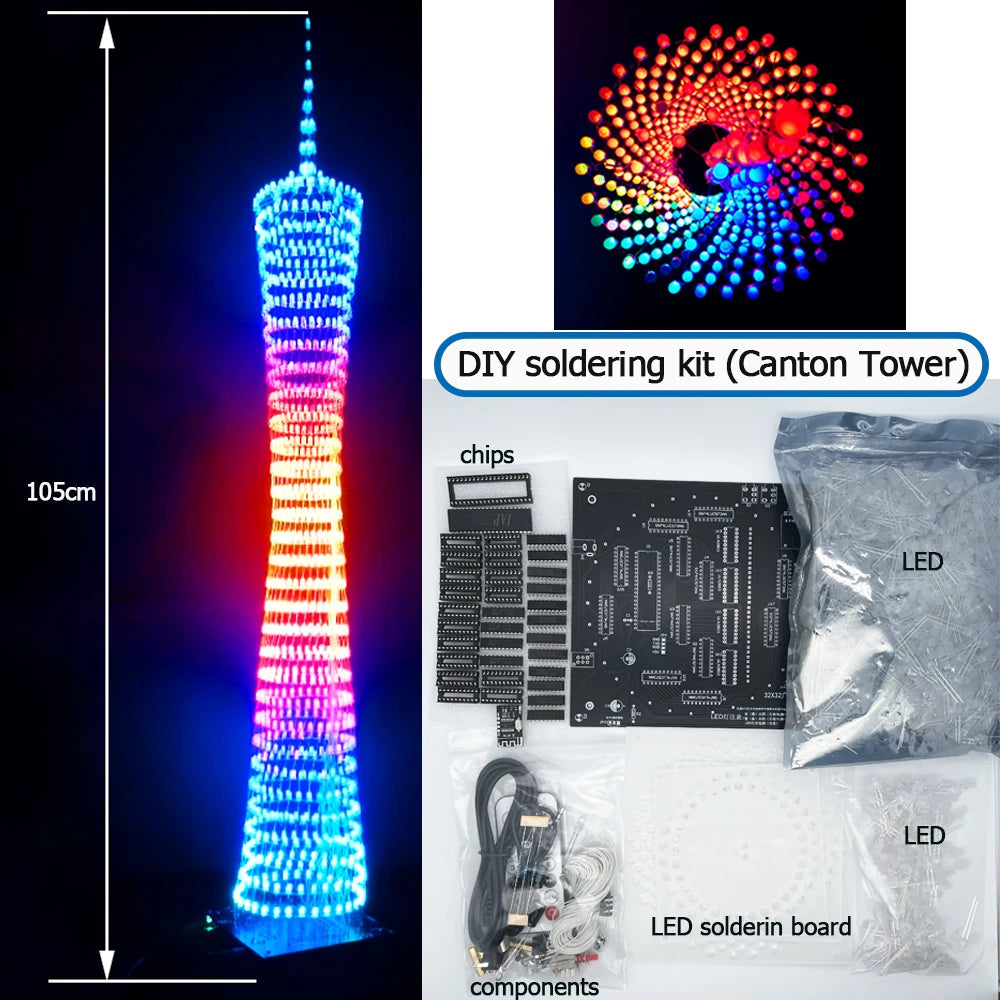
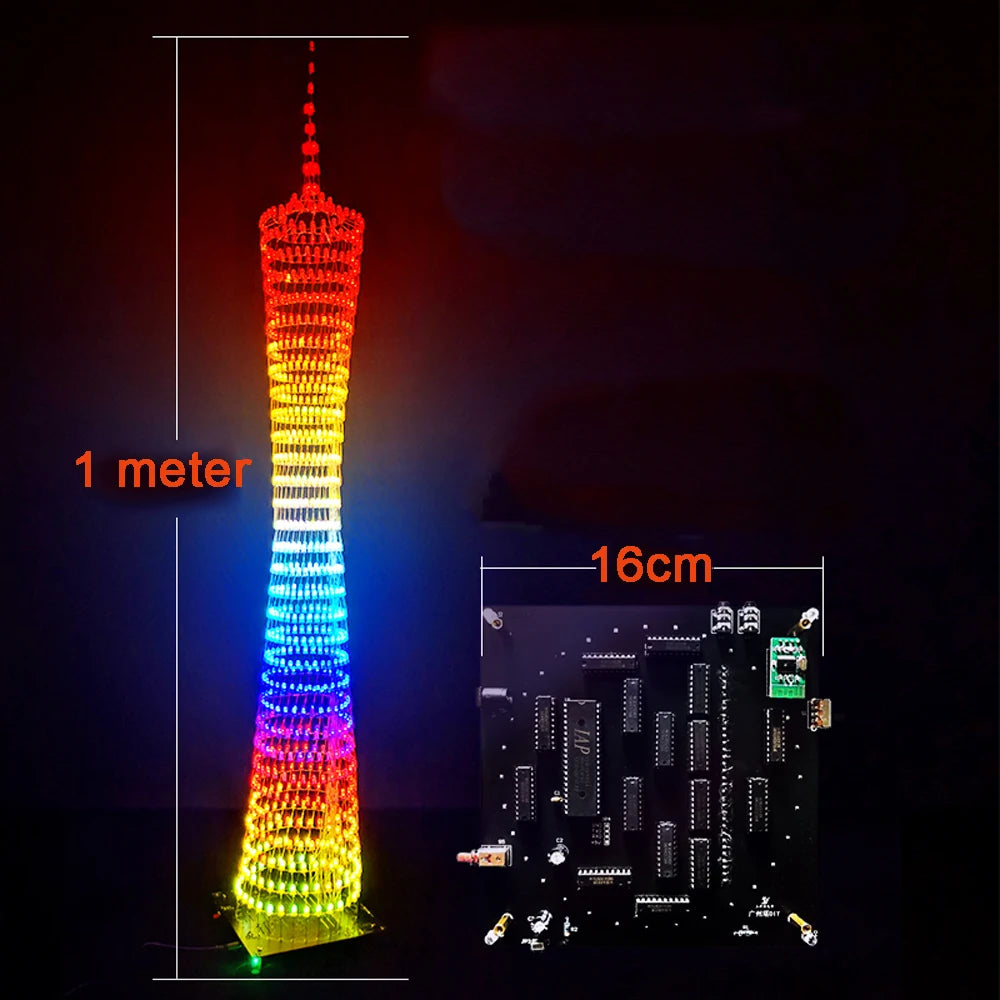
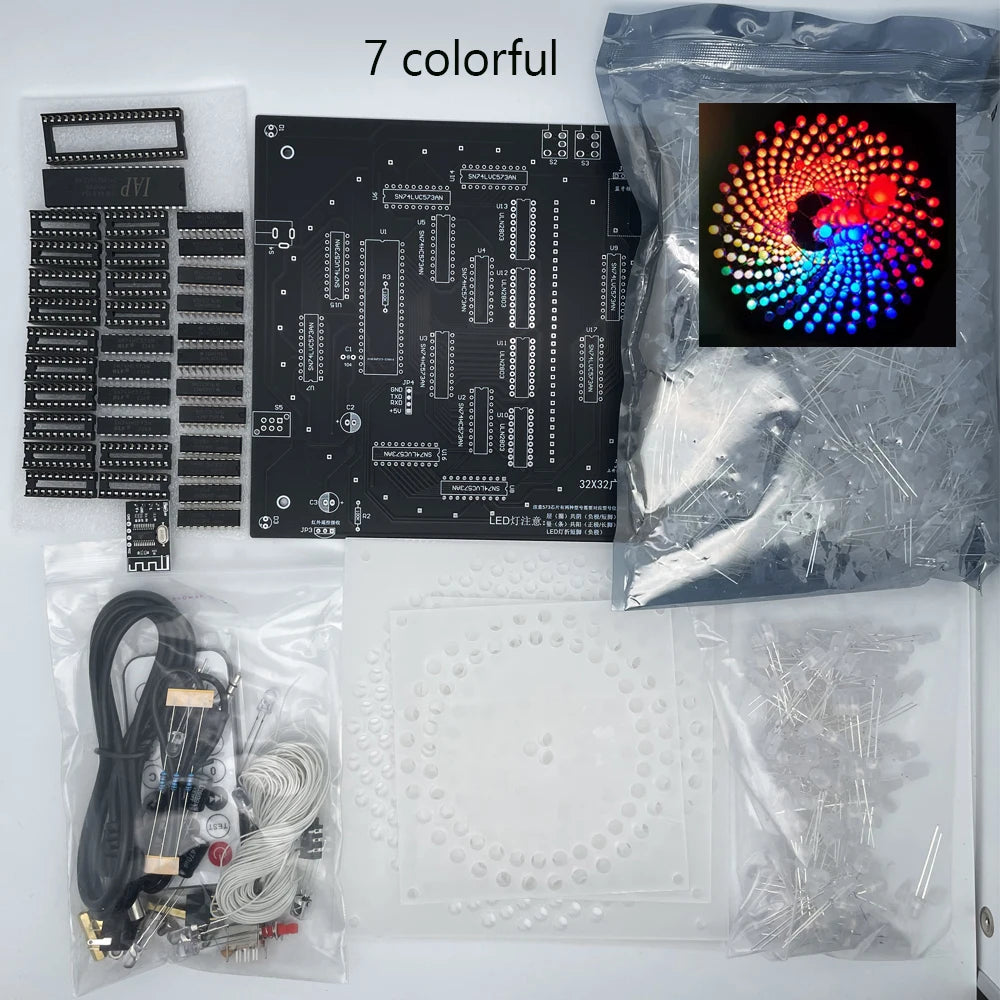
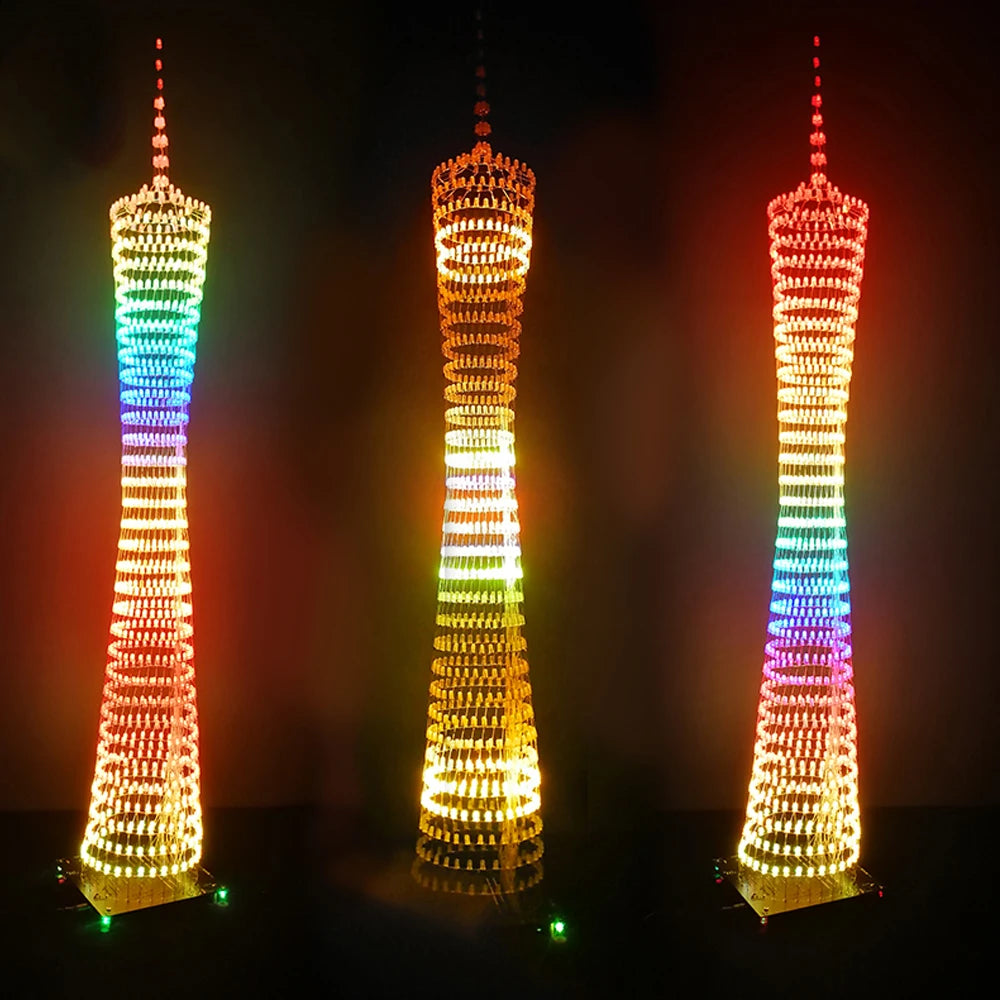
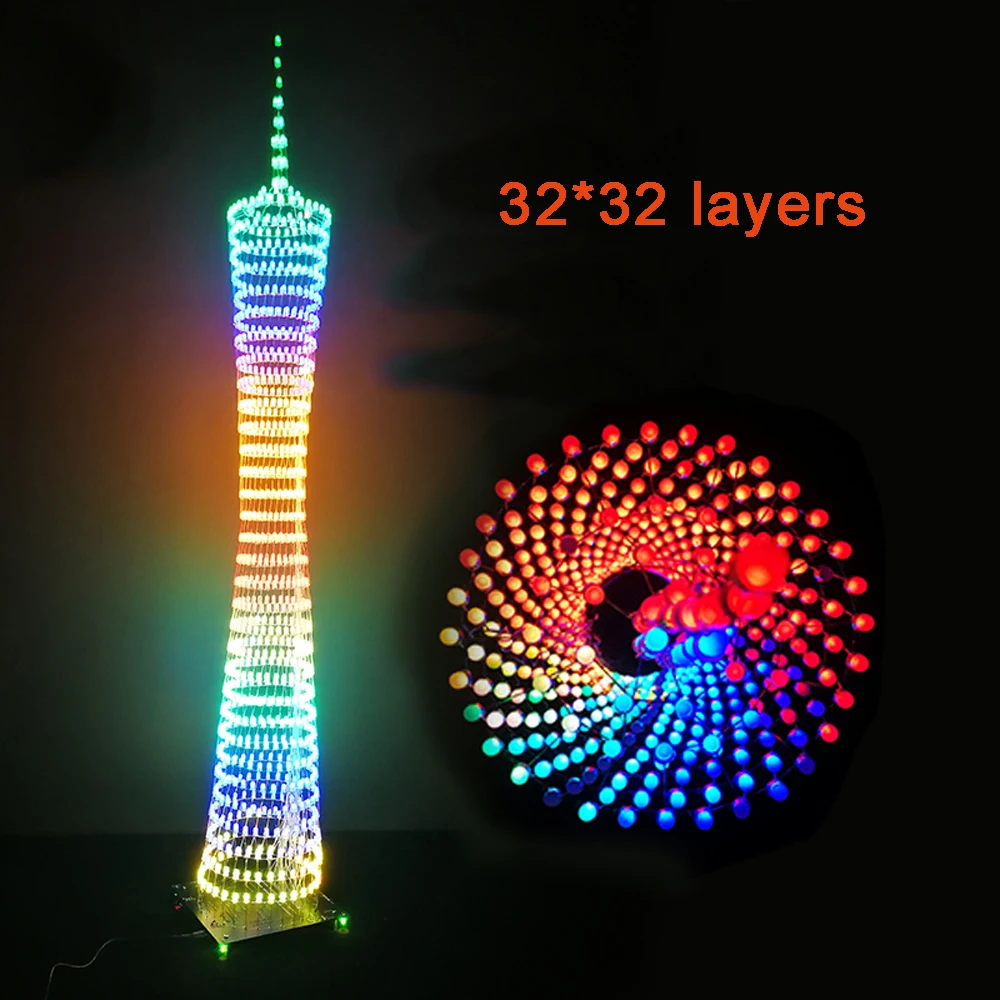
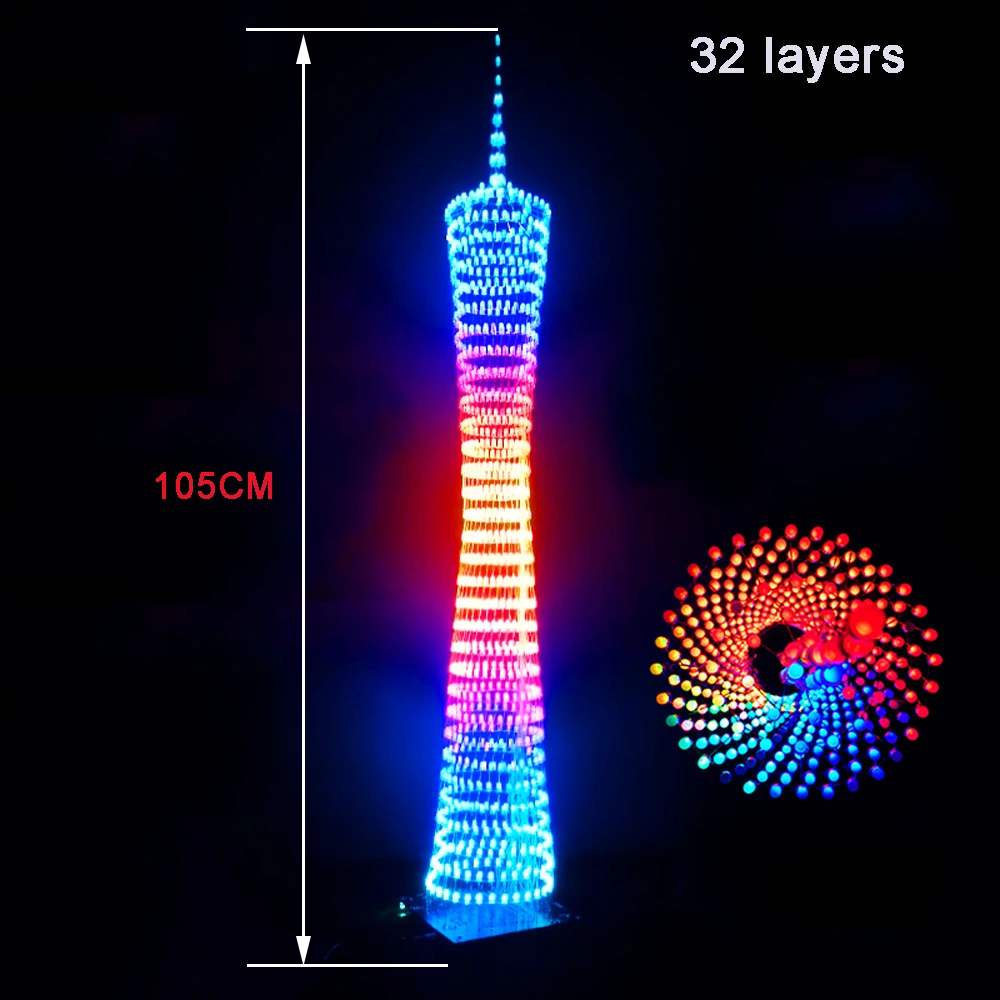
DIY Canton Tower soldering kit (not assembled)
DIY Canton Tower soldering kit (not assembled)
Couldn't load pickup availability
SPECIFICATIONS
Brand Name: NoEnName_Null
Hign-concerned Chemical: None
Model Number: 32*32
Origin: Mainland China
Subject: PHYSICS
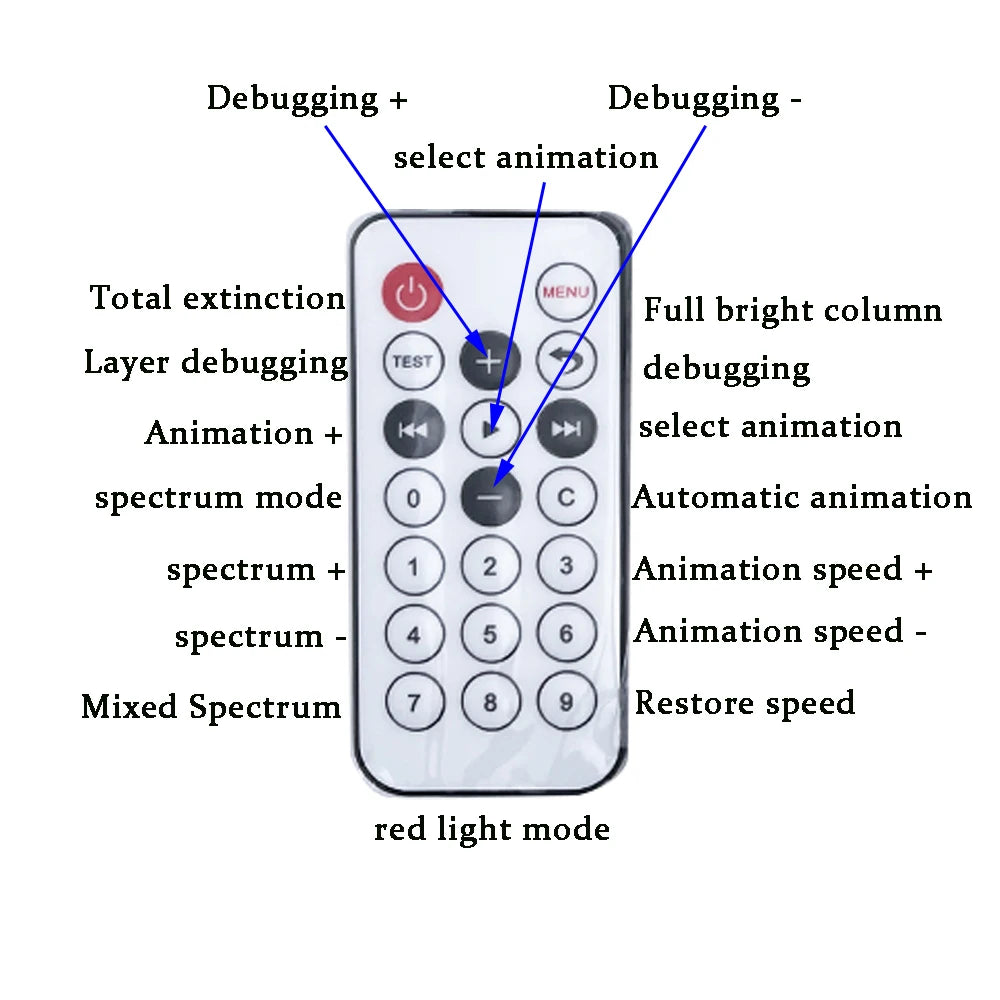
25 animation modes (speed adjustable)
9+1 spectrum modes (1 is a hybrid mode)
Bluetooth link
Case not included
Operating voltage: 5V3A
(Provide email to customer service to send tutorials via Email)
Scroll down this page to see the welding tutorial ↓↓↓↓↓↓↓↓↓
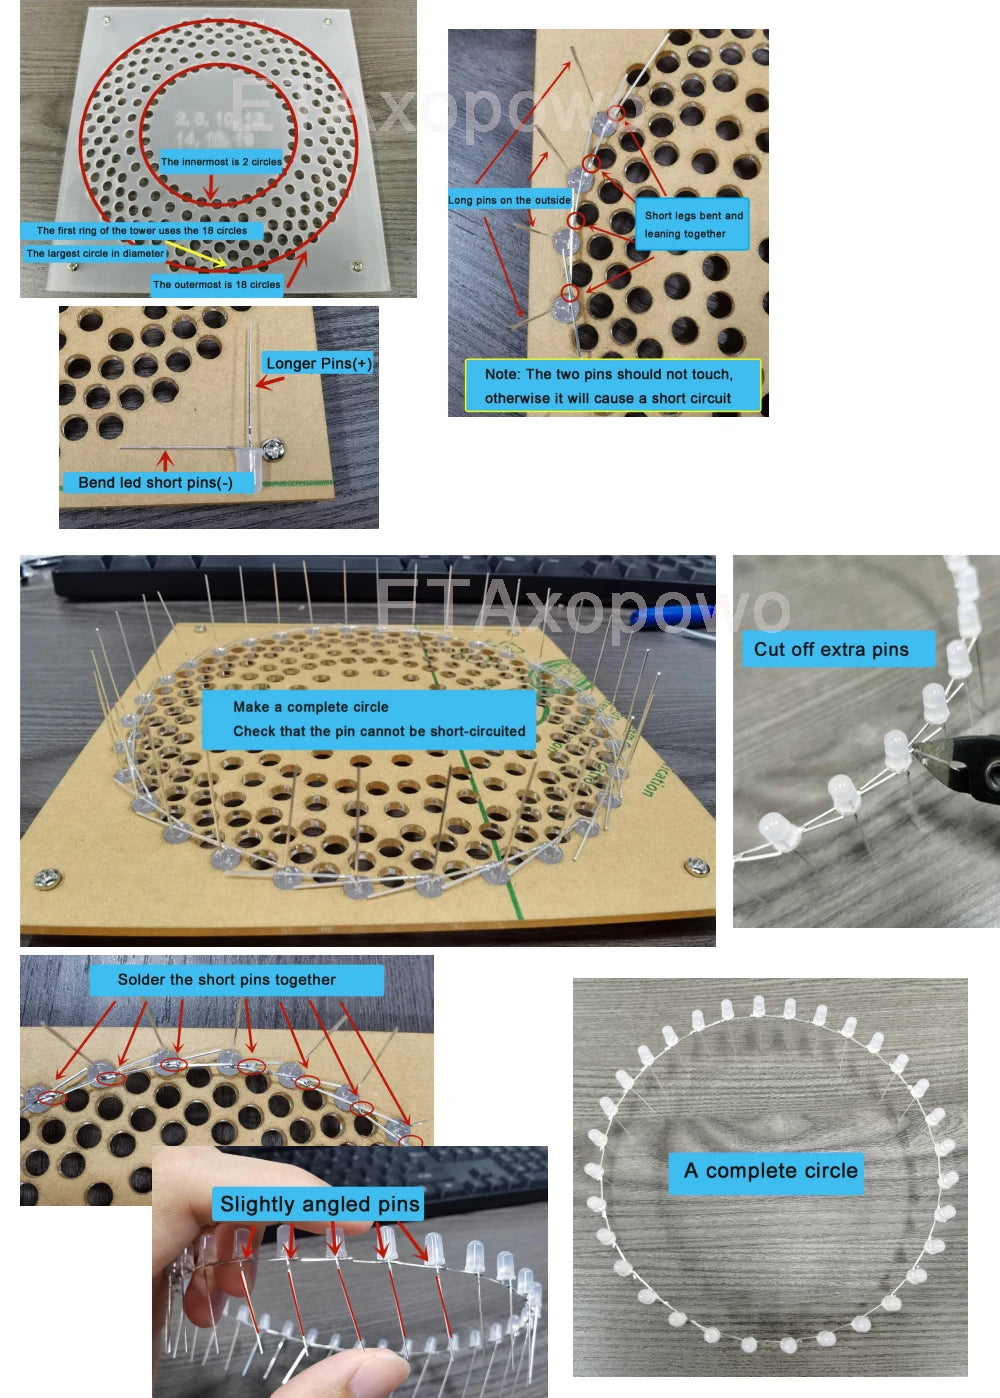
Welding of LED parts, bending of short leg negative pole, welding of light ring.
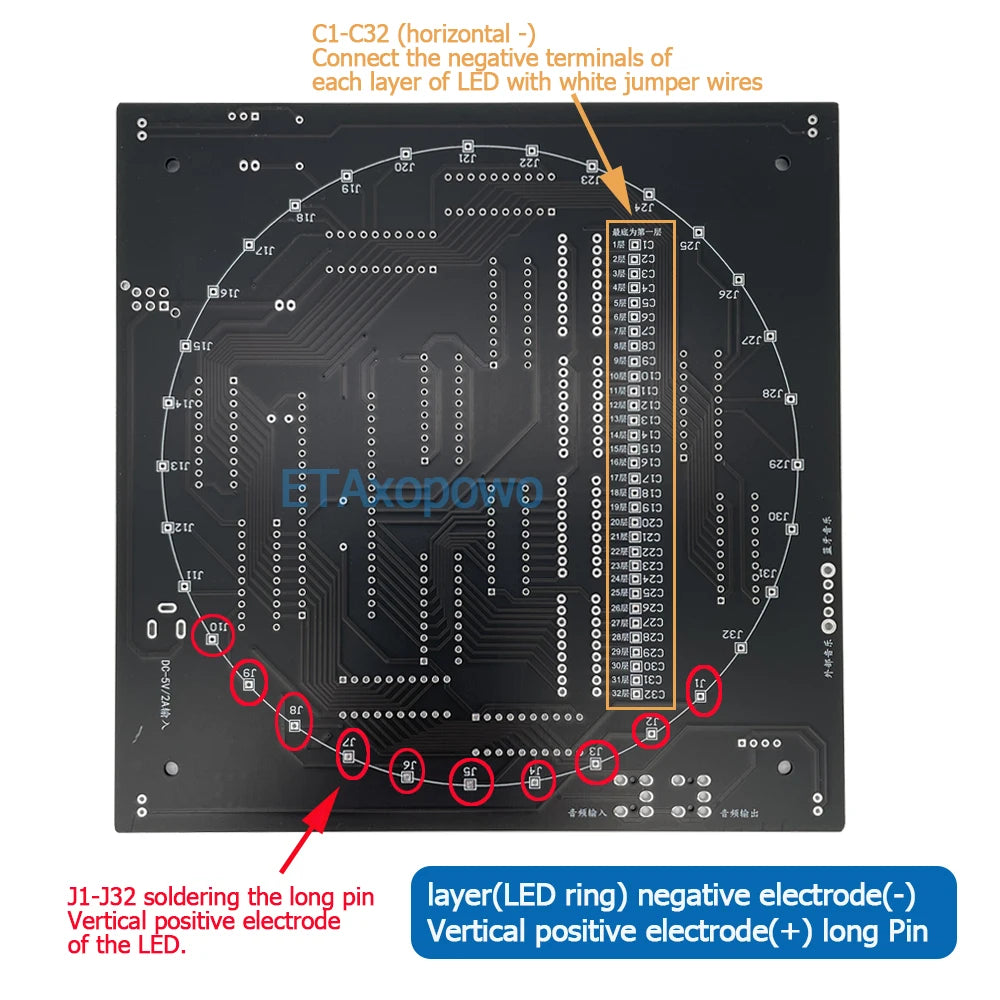
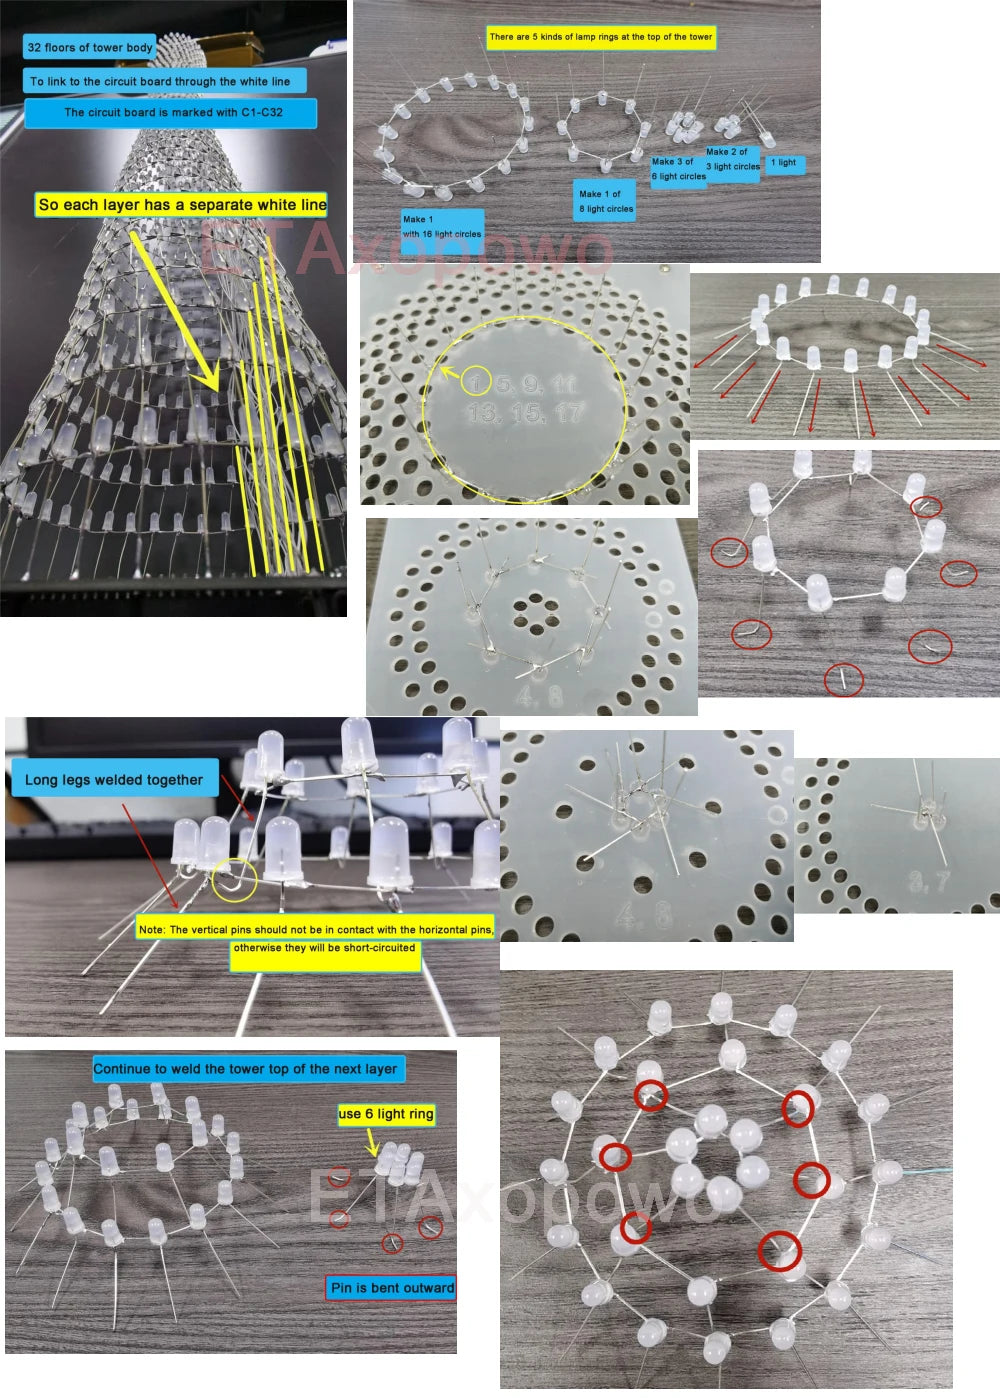
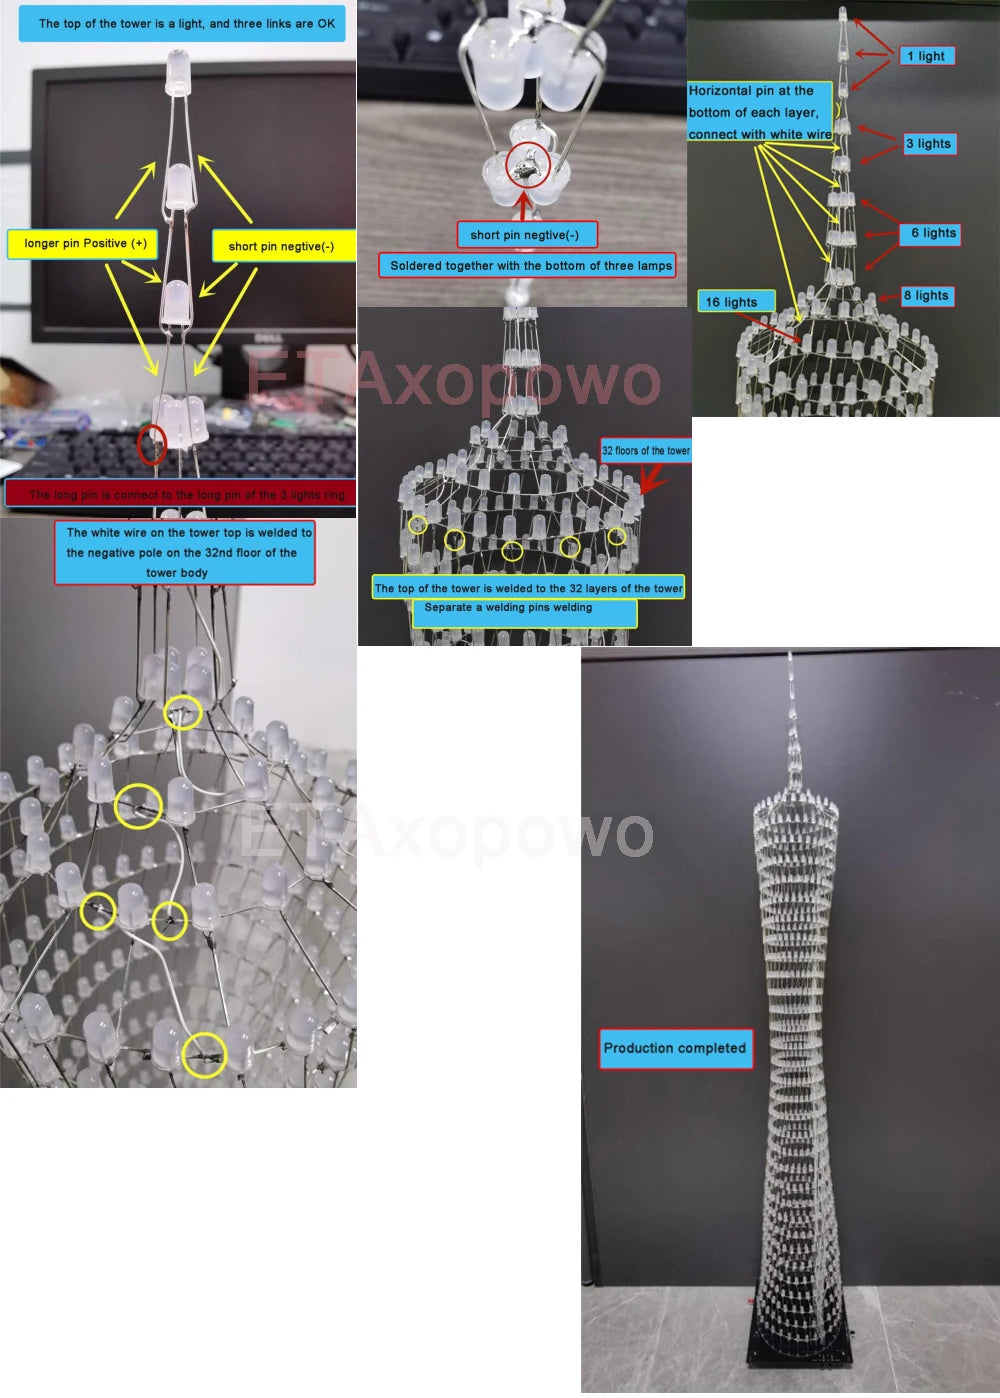
So each layer's LED is connected to the negative pole. Finally, it is connected to the PCB's C1-32 via white jumper wires
The positive electrode is vertical, and the vertical LED is soldered onto J1-J32 of the PCB
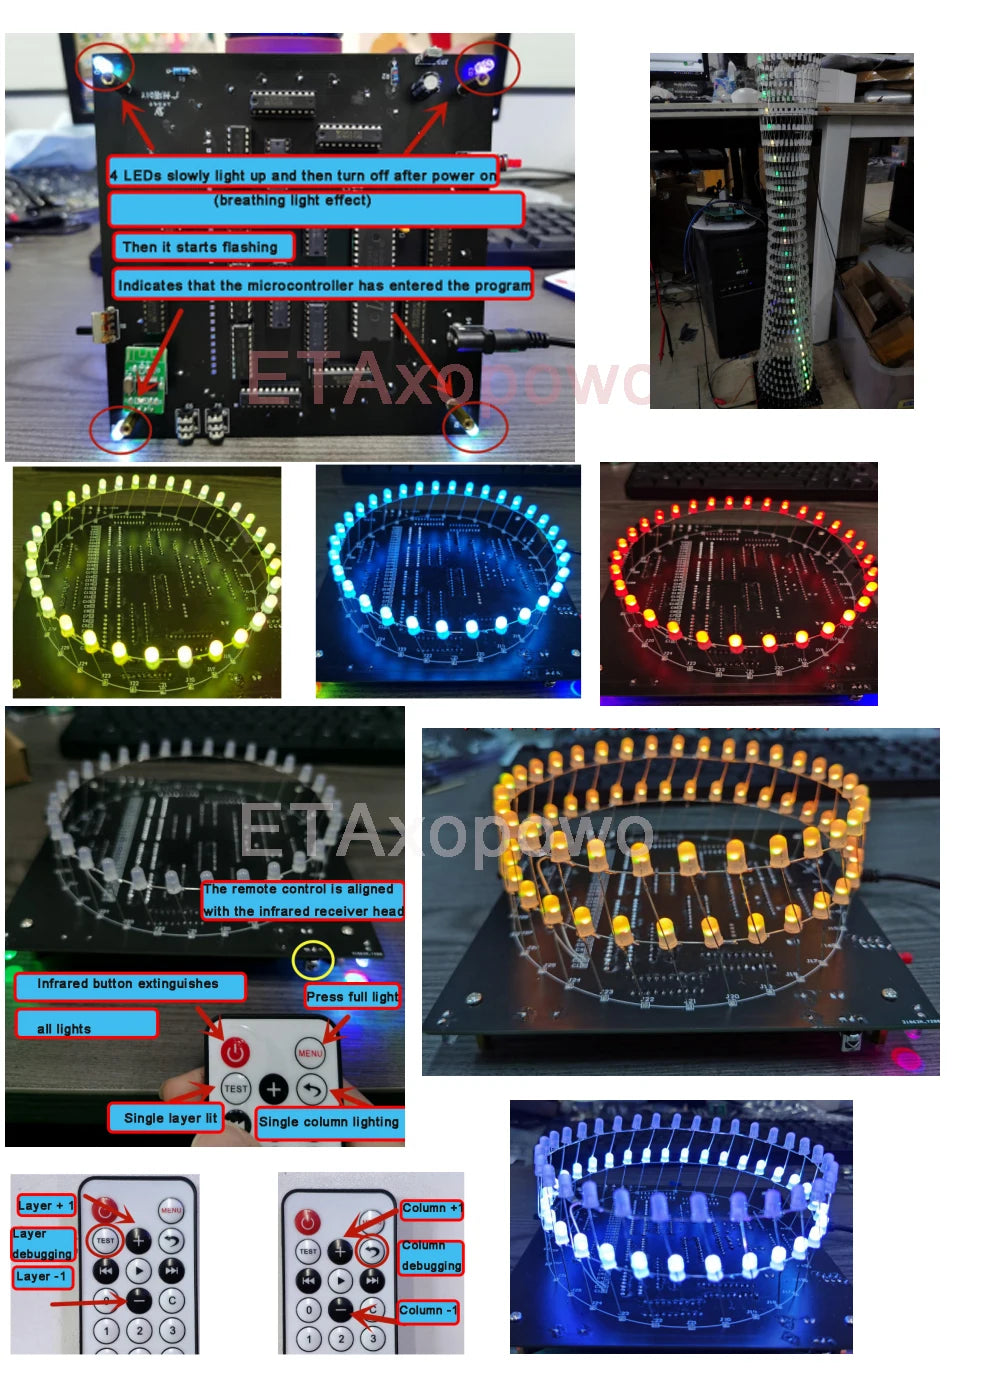
Conduct testing after welding.
In layer/column debugging mode, each layer and column should be
Illuminated separately (both the top of the tower and the 32nd floor are lit simultaneously)!!!
If it is found during debugging that a certain layer/column cannot be clicked
If it is lit up, or if two layers are lit up at the same time, it is abnormal,
The subsequent animation may flicker uncontrollably.


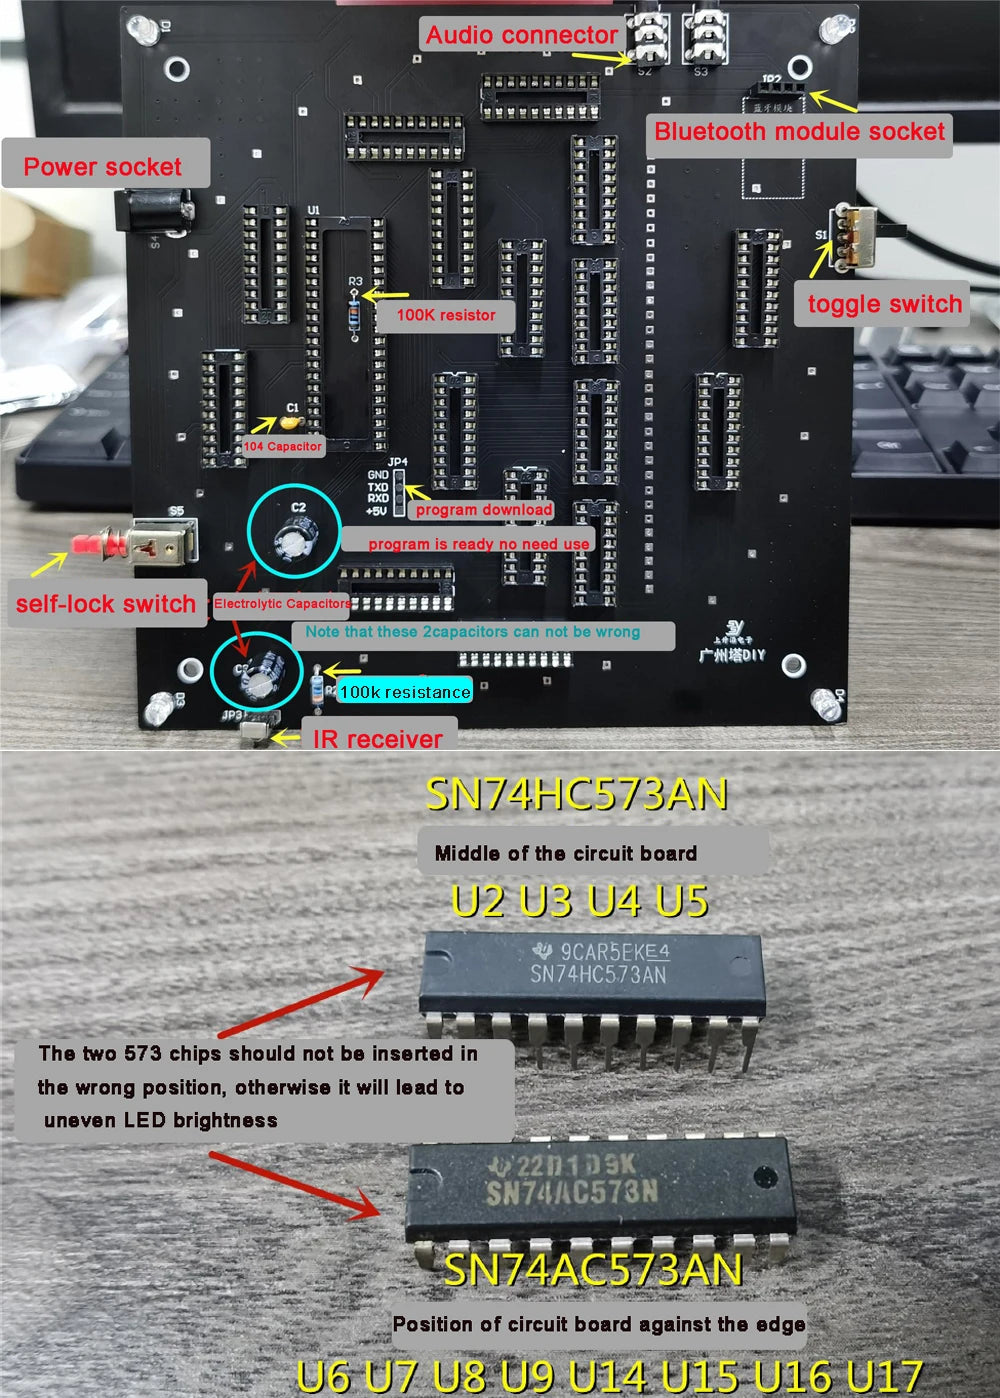
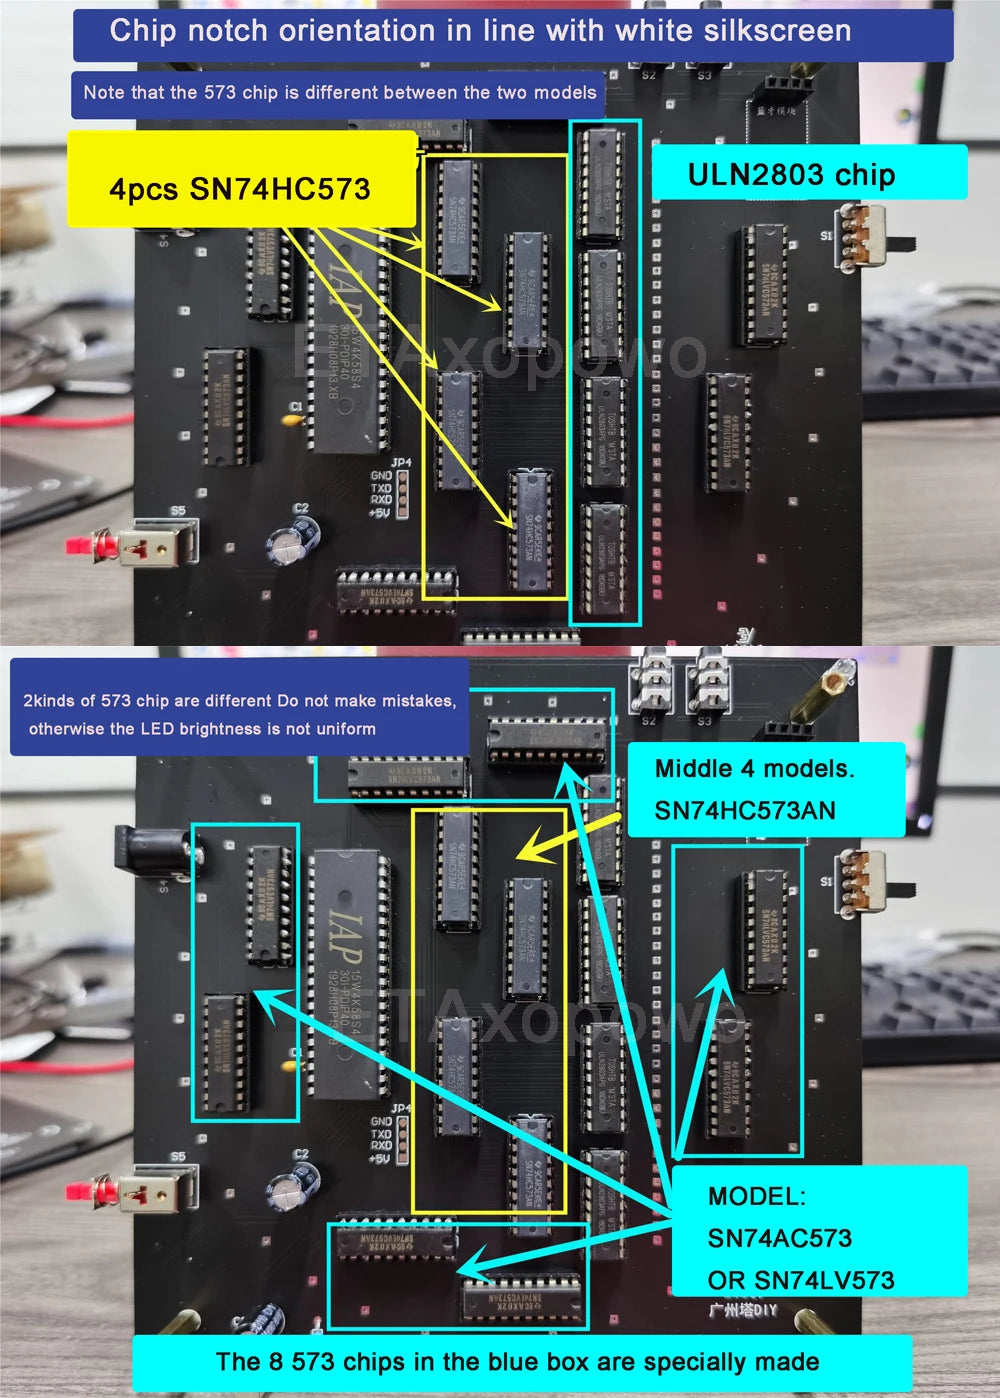
Soldering Tutorial !!!
Tips:
1.the micro-controller has downloaded a program, please do not download overwrite changes!
2.Note that the LEDs of the whole tower are fixed and soldered to the side of the PCB board without the micro-controller.
side, never solder to the side with a micro-controller
3.led welding easy to broken, light welding, pay attention to anti-static, soldering iron temperature to about 300 degrees, welding time control within 2 seconds, the iron can not touch the led two pins at the same time. Can not adjust the temperature of the iron can be used to sponge to cool down the iron and then welding.
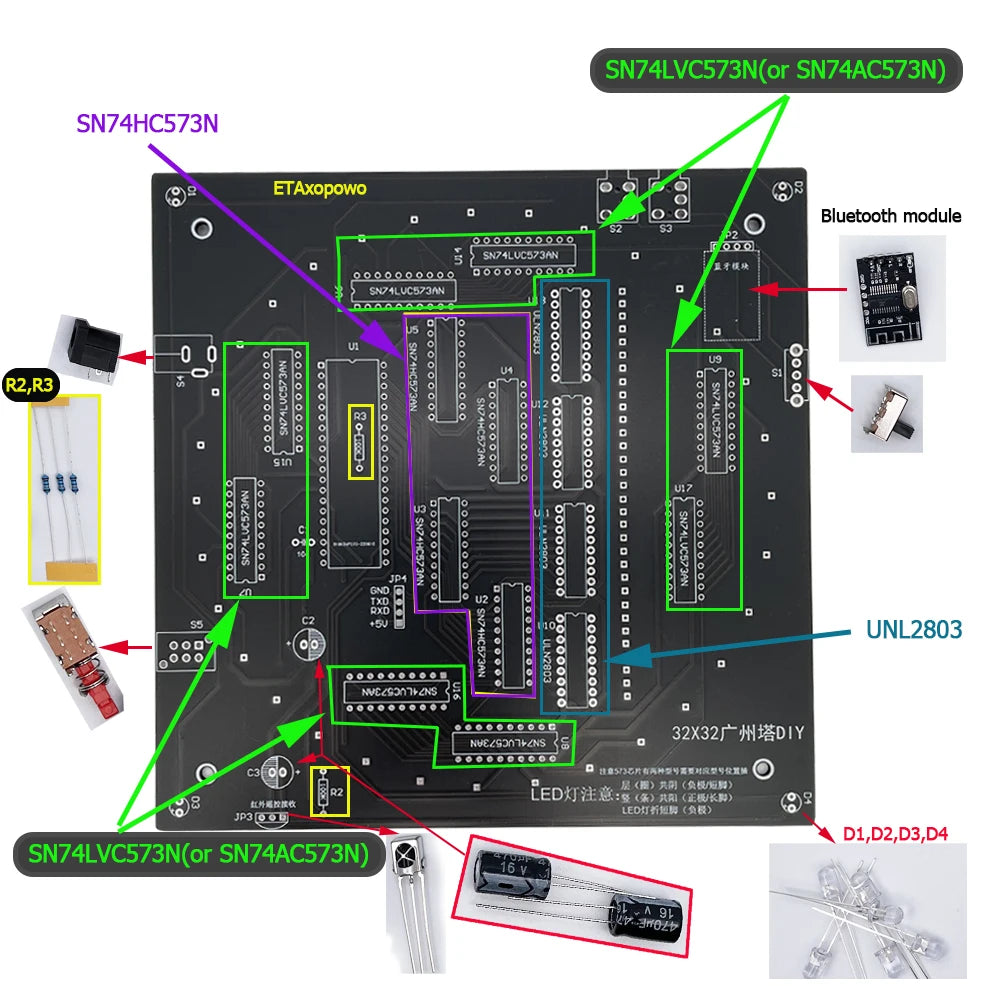
1.Circuit Board soldering
Note that the solder joints behind the chip can not be connected, false solder


2. Partial soldering of lighthouse
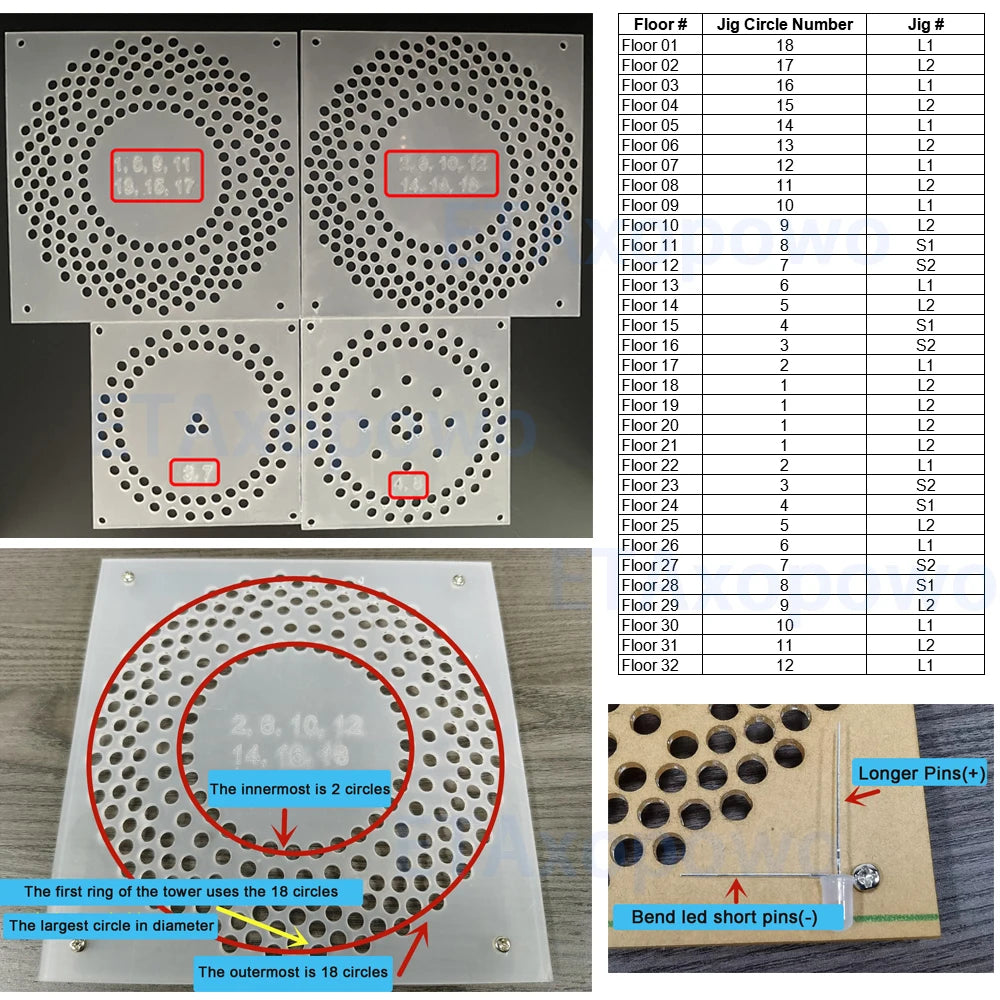
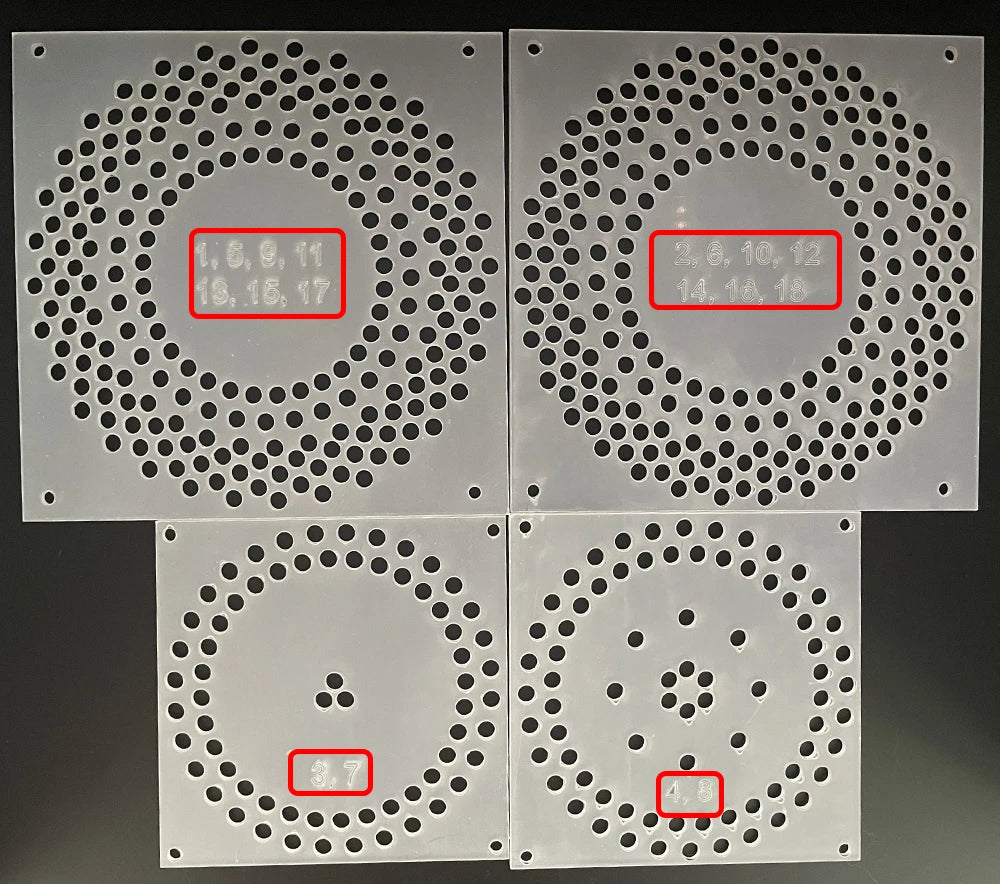
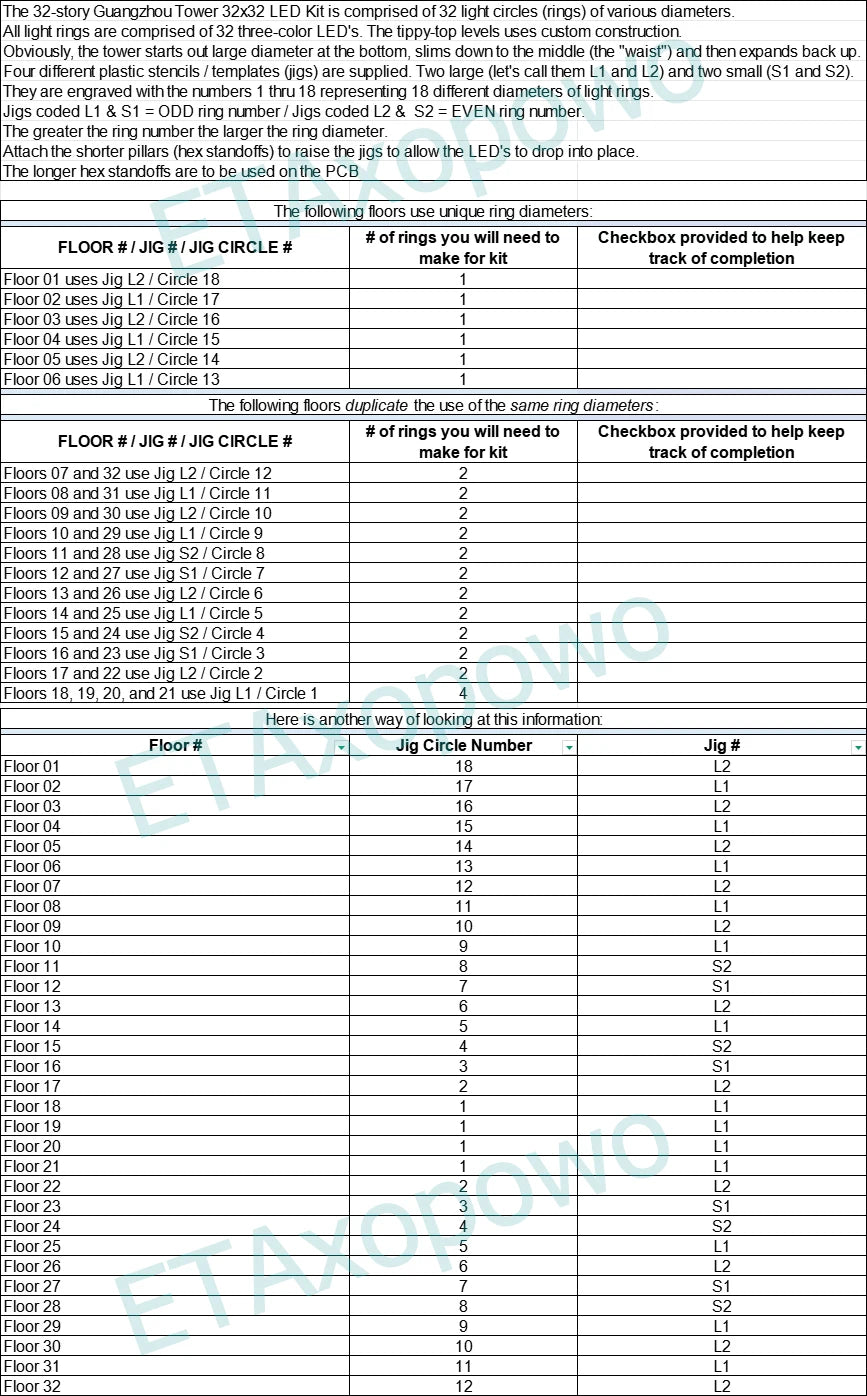
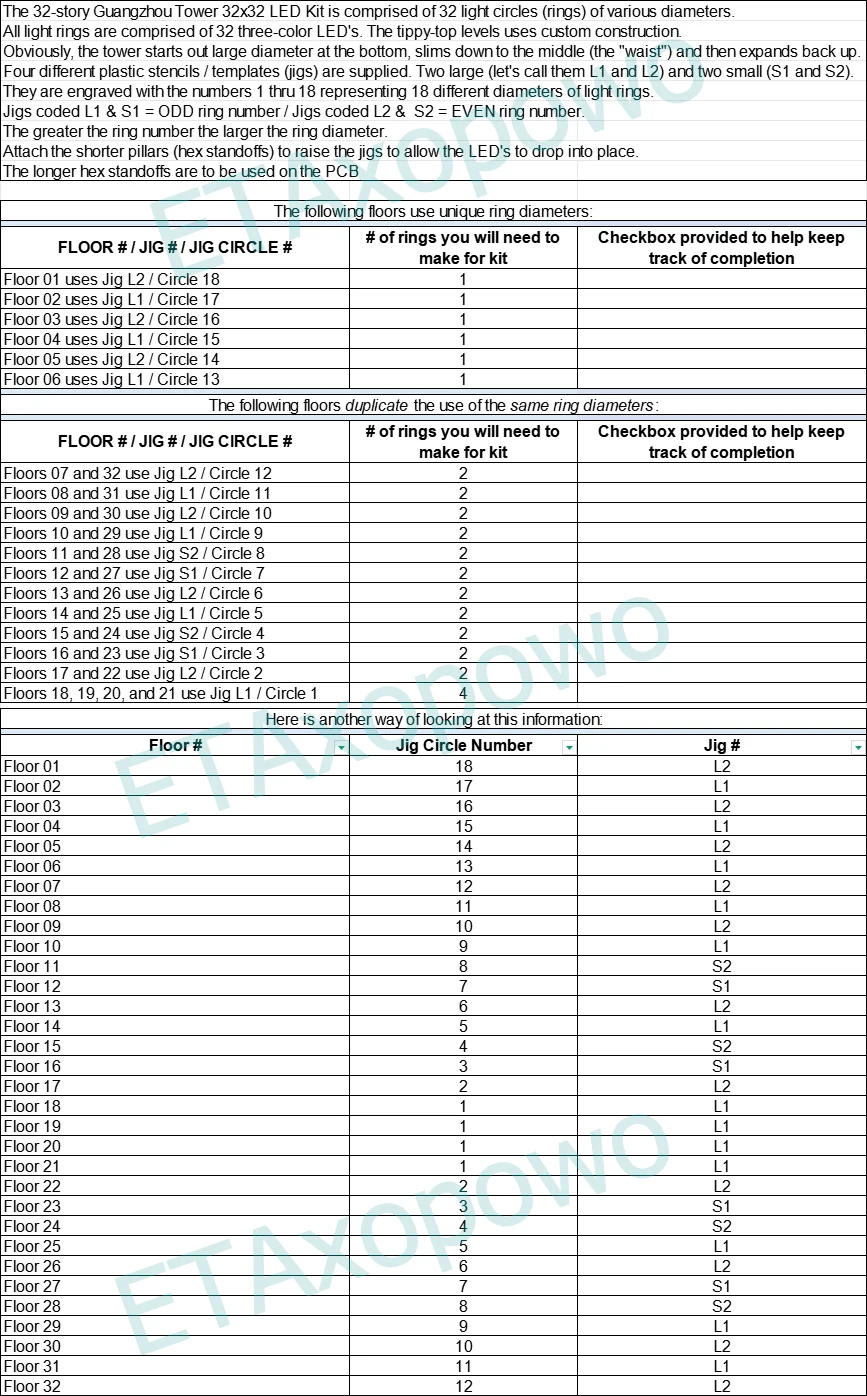
Total of 4 light circle templates

The stencil is marked with the numbers 1-18, representing 18 different sizes of light rings
The 32-story Guangzhou Tower requires 32 light rings to be welded to the tower.
The first layer of the tower is 18 laps of the template (the larger the number, the larger the diameter of the light circle)
(light circle from the outside to the inside, the number from large to small)

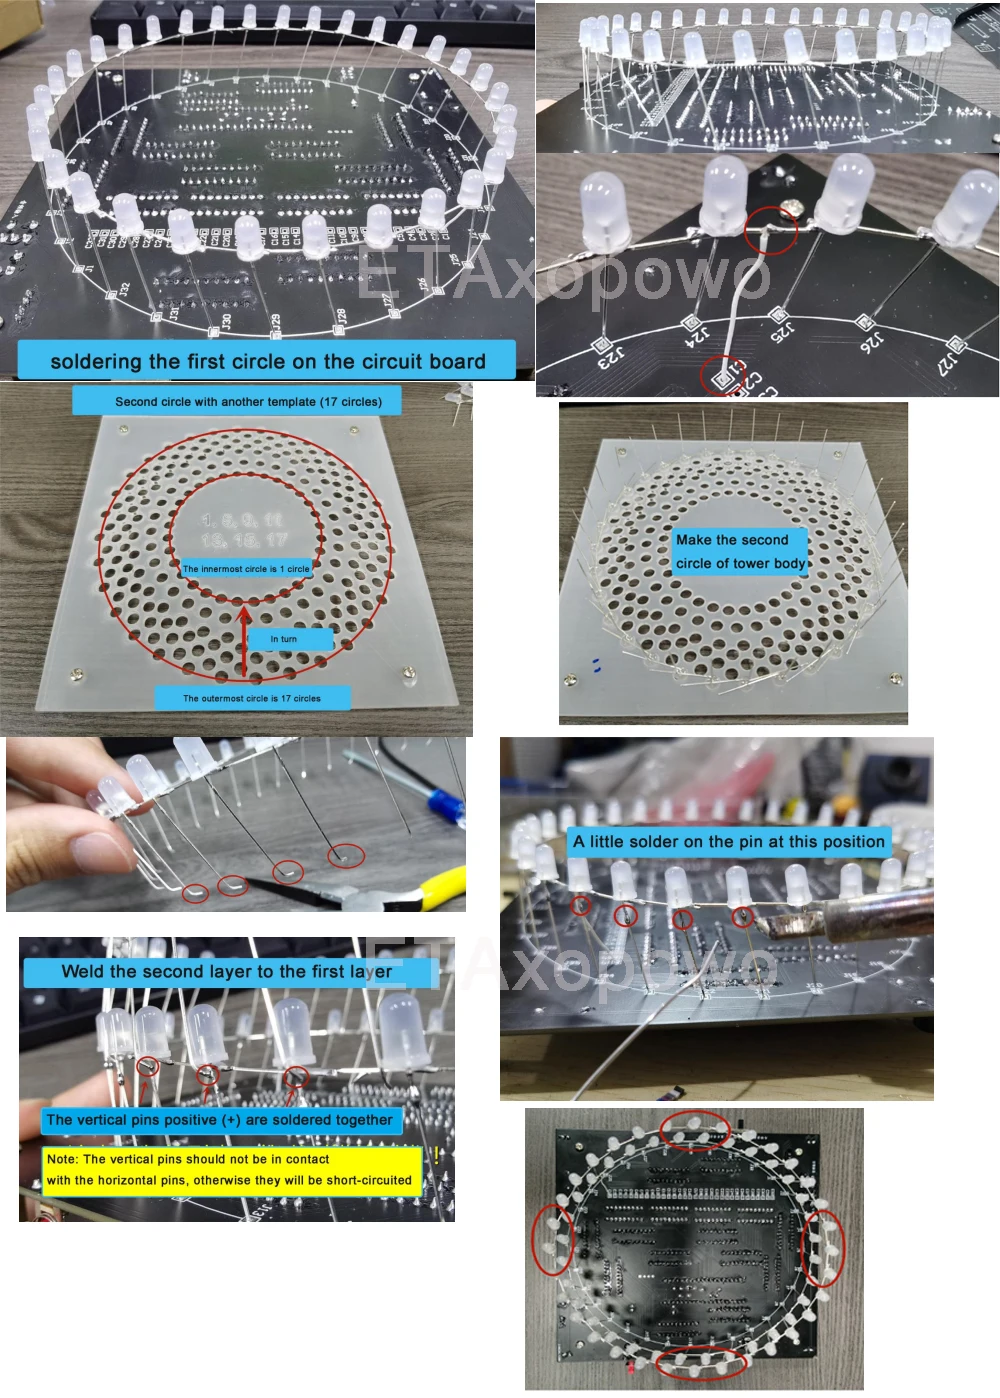 Complete the welding of the second layer!
Next, continue to weld the 32 layers of the tower body according to the given four lamp ring templates (there are numbers corresponding on the template)
The larger the number, the larger the diameter of the lamp ring! Note that the first layer is the largest circle! That is, the circle with the number 18 on the template! Pay attention to the distinction!!! Use white wire to weld C1-C32 on the circuit board from the 1st to the 32nd floors of the tower body!!!
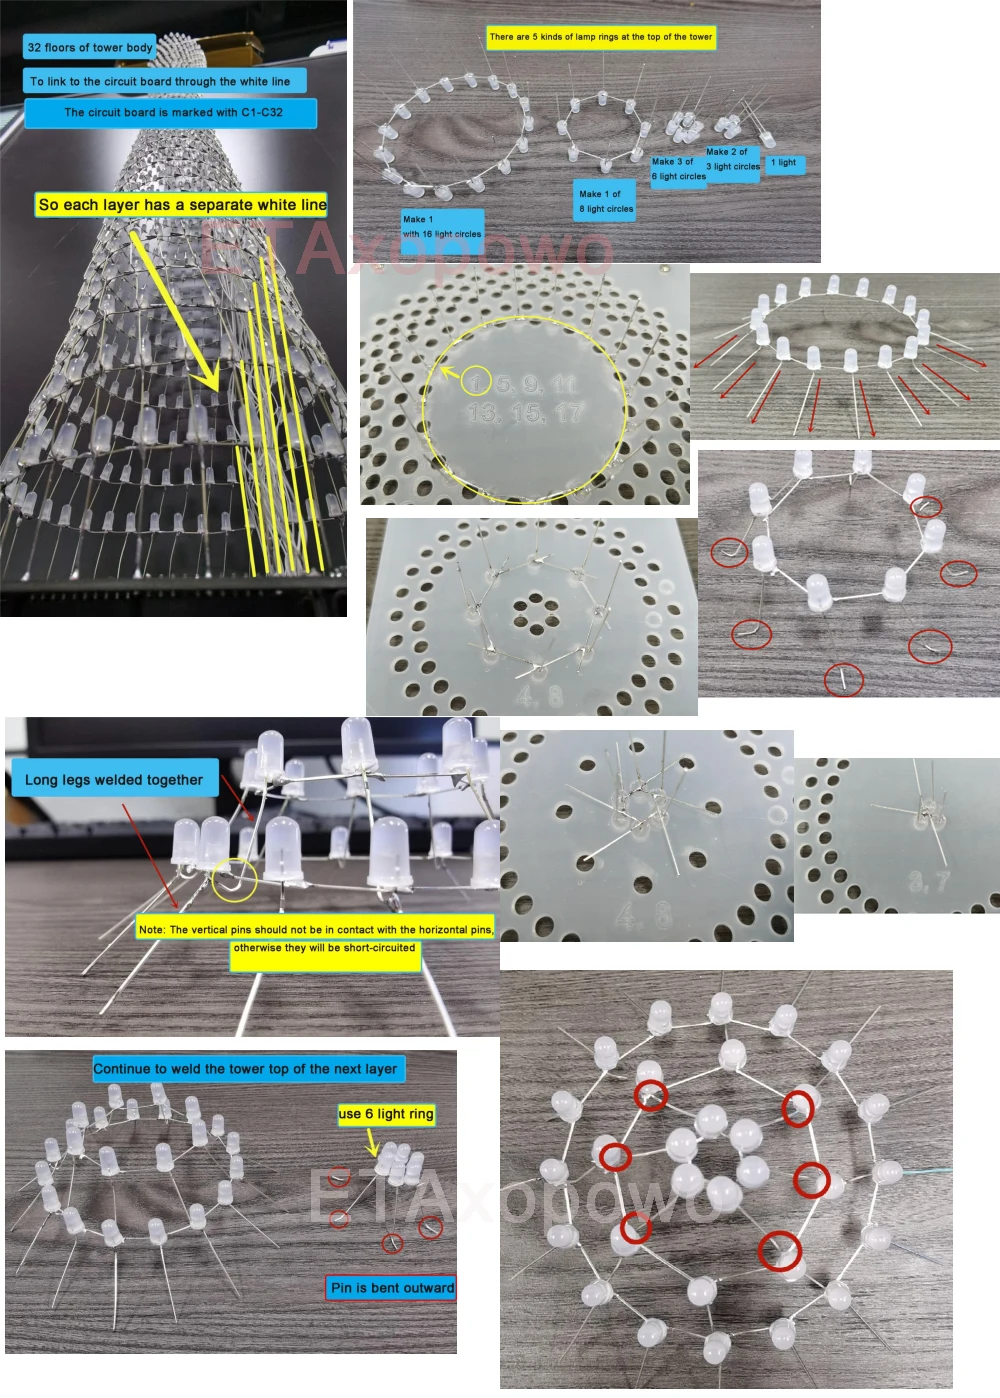 The layer of lamp 6 is welded on the top of lamp 8. Note that only 6 pins need to be welded
Note that the pin is wound from the ground.
The horizontal pin must not touch the vertical pin, otherwise it will cause a short circuit

Note that !!!!!
layer/column debug mode each layer and column should be lit individually (top of the tower and layer 32 are lit at the same time) !!! If, during debugging, you find that a layer/column does not light
If, during debugging, a layer/column cannot be lit, or two layers/columns are lit at the same time, then it is an exception and If you find during debugging that a layer/column cannot be lit, or that two layers/columns are lit at the same time, it is an exception, and the later animation may flash uncontrollably
The reasons for the anomaly may be as follows.
1, the light circle on the horizontal foot and vertical foot have touched together, resulting in a short circuit
2, can not light up the layer / column on a certain light is bad
3, the light foot welding with false welding
4, the top of the tower is most likely to appear horizontal and vertical feet touching together Short-circuit situation, if the tower body debugging normal, welding The top of the tower is abnormal, focus on checking the top of the tower welding
After welding the base plate and the first layer of lights can be powered on to test
After power on, the 4 LEDs light up slowly and then turn off (breathing light effect). Then start flashing, indicating that the micro-controller has entered the program.


